
Host on Render
Host your site on Render.
Use these instructions to enable continuous deployment from a GitHub repository. The same general steps apply if you are using Bitbucket or GitLab for version control.
Prerequisites
Please complete the following tasks before continuing:
- Create a Render account
- Log in to your Render account
- Create a GitHub account
- Log in to your GitHub account
- Create a GitHub repository for your project
- Create a local Git repository for your project with a remote reference to your GitHub repository
- Create a Hugo project within your local Git repository and test it with the
hugo servercommand
Procedure
- Step 1
- Create a Render Blueprint in the root of your project.render.yaml
services: - type: web name: hosting-render repo: https://github.com/jmooring/hosting-render runtime: static buildCommand: chmod a+x build.sh && ./build.sh staticPublishPath: public envVars: - key: DART_SASS_VERSION value: 1.99.0 - key: GO_VERSION value: 1.26.2 - key: HUGO_VERSION value: 0.161.1 - key: NODE_VERSION value: 24.15.0 - key: TZ value: Europe/Oslo - Step 2
- Create a
build.shfile in the root of your project.build.sh#!/usr/bin/env bash #------------------------------------------------------------------------------ # @file # Builds a Hugo site hosted on a Render. # # Render automatically installs Node.js dependencies. #------------------------------------------------------------------------------ # Exit on error, undefined variables, or pipe failures set -euo pipefail build_temp_dir="" # Perform cleanup cleanup() { if [[ -n "${build_temp_dir:-}" && -d "${build_temp_dir}" ]]; then rm -rf "${build_temp_dir}" fi } # Register the cleanup trap trap cleanup EXIT SIGINT SIGTERM main() { # Create and move into a temporary directory for downloads build_temp_dir=$(mktemp -d) pushd "${build_temp_dir}" > /dev/null # Create the local tools directory mkdir -p "${HOME}/.local" # Install Dart Sass echo "Installing Dart Sass ${DART_SASS_VERSION}..." curl -sLJO "https://github.com/sass/dart-sass/releases/download/${DART_SASS_VERSION}/dart-sass-${DART_SASS_VERSION}-linux-x64.tar.gz" tar -C "${HOME}/.local" -xf "dart-sass-${DART_SASS_VERSION}-linux-x64.tar.gz" export PATH="${HOME}/.local/dart-sass:${PATH}" # Install Go echo "Installing Go ${GO_VERSION}..." curl -sLJO "https://go.dev/dl/go${GO_VERSION}.linux-amd64.tar.gz" tar -C "${HOME}/.local" -xf "go${GO_VERSION}.linux-amd64.tar.gz" export PATH="${HOME}/.local/go/bin:${PATH}" # Install Hugo echo "Installing Hugo ${HUGO_VERSION}..." curl -sLJO "https://github.com/gohugoio/hugo/releases/download/v${HUGO_VERSION}/hugo_${HUGO_VERSION}_linux-amd64.tar.gz" mkdir -p "${HOME}/.local/hugo" tar -C "${HOME}/.local/hugo" -xf "hugo_${HUGO_VERSION}_linux-amd64.tar.gz" export PATH="${HOME}/.local/hugo:${PATH}" # Return to the project root popd > /dev/null # Verify installations echo "Verifying installations..." echo Dart Sass: "$(sass --version)" echo Go: "$(go version)" echo Hugo: "$(hugo version)" echo Node.js: "$(node --version)" # Configure Git echo "Configuring Git..." git config core.quotepath false if [ "$(git rev-parse --is-shallow-repository)" = "true" ]; then git fetch --unshallow fi # Build the site echo "Building the site..." hugo build --gc --minify --baseURL "${RENDER_EXTERNAL_URL}" } main "$@" - Step 3
- Commit the changes to your local Git repository and push to your GitHub repository.
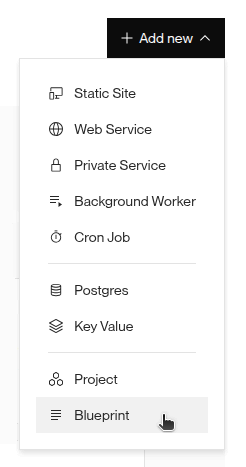
- Step 4
- On the Render dashboard, press the Add new button and select “Blueprint” from the drop-down menu.
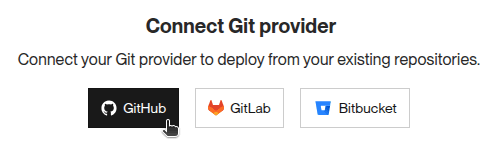
- Step 5
- Press the GitHub button to connect to your GitHub account.
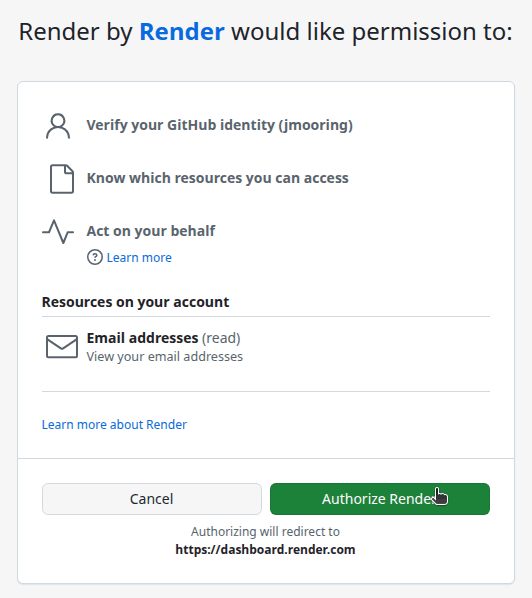
- Step 6
- Press the Authorize Render button to allow the Render application to access your GitHub account.
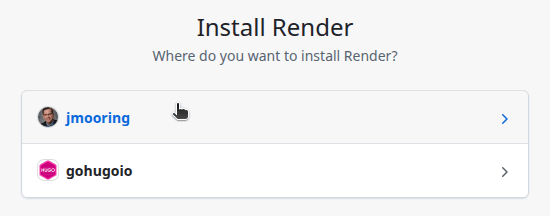
- Step 7
- Select the GitHub account where you want to install the Render application.
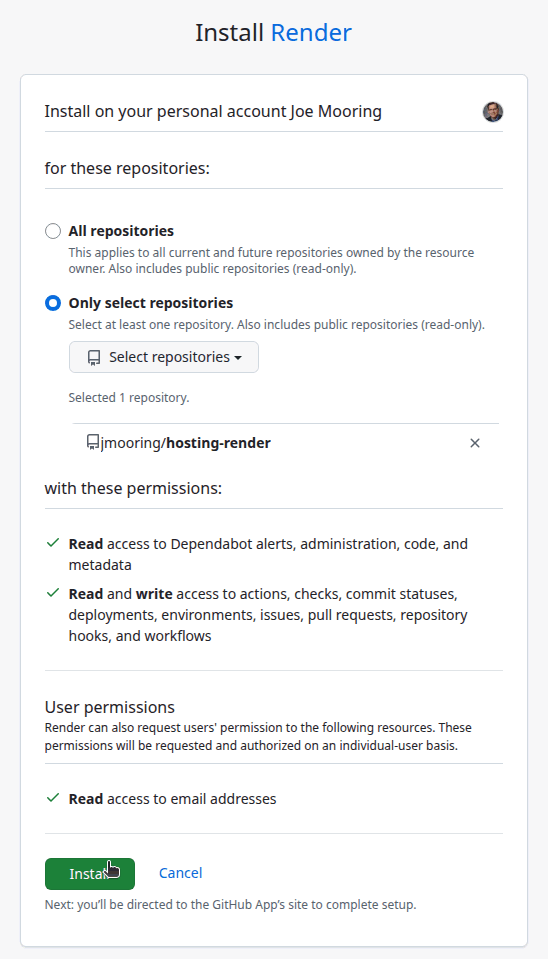
- Step 8
- Authorize the Render application to access all repositories or only select repositories, then press the Install button.
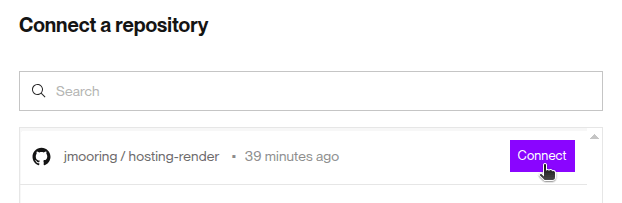
- Step 9
- On the “Create a new Blueprint Instance in My Workspacee” page, press the Connect button to the right of the name of your GitHub repository.
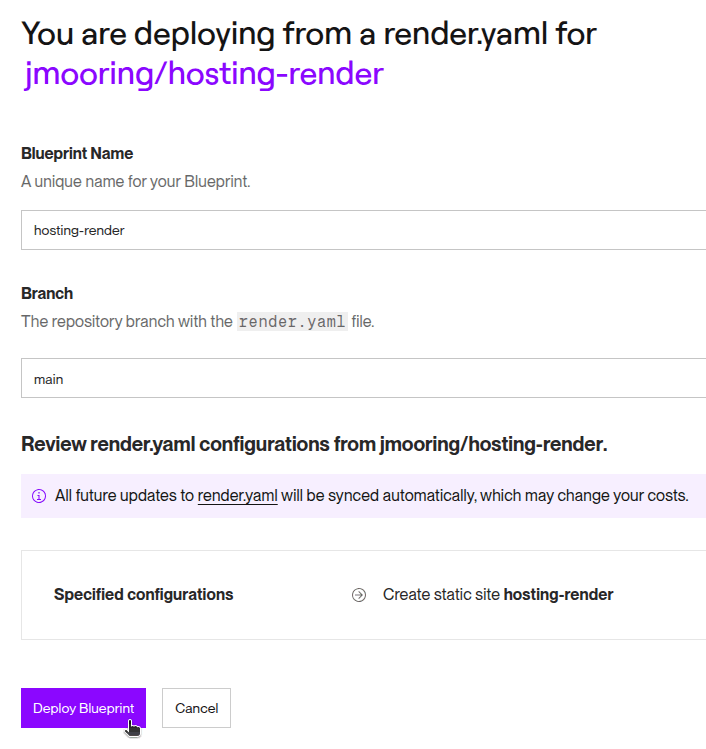
- Step 10
- Enter a unique name for your Blueprint, then press the Deploy Blueprint button at the bottom of the page.
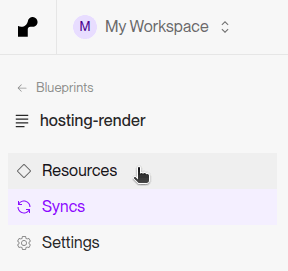
- Step 11
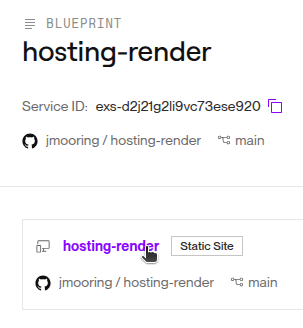
- Wait for the site to build and deploy, then click on the “Resources” link on the left side of the page.
- Step 12
- Click on the link to the static site resource.
- Step 13
- Click on the link to your published site.

In the future, whenever you push a change from your local Git repository, Render will rebuild and deploy your site.