
Host on GitHub Pages
Host your site on GitHub Pages.
Types of sites
There are three types of GitHub Pages sites: project, user, and organization. Project sites are connected to a specific project hosted on GitHub. User and organization sites are connected to a specific account on GitHub.com.
See the GitHub Pages documentation to understand the requirements for repository ownership and naming.
Prerequisites
Please complete the following tasks before continuing:
- Create a GitHub account
- Log in to your GitHub account
- Create a GitHub repository for your project
- Create a local Git repository for your project with a remote reference to your GitHub repository
- Create a Hugo project within your local Git repository and test it with the
hugo servercommand - Commit the changes to your local Git repository and push to your GitHub repository
Procedure
- Step 1
- Visit your GitHub repository. From the main menu choose Settings > Pages. In the center of your screen you will see this:
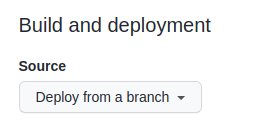
Change the Source to
GitHub Actions. The change is immediate; you do not have to press a Save button.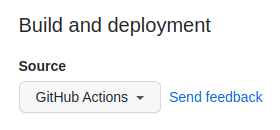
- Step 2
- In your project configuration, change the location of the image cache to the
cacheDiras shown below:caches: images: dir: :cacheDir/images[caches] [caches.images] dir = ':cacheDir/images'{ "caches": { "images": { "dir": ":cacheDir/images" } } }See configure file caches for more information.
- Step 3
- Create a file named
hugo.yamlin a directory named.github/workflows.mkdir -p .github/workflows touch .github/workflows/hugo.yaml - Step 4
- Copy and paste the YAML below into the file you created..github/workflows/hugo.yaml
name: Build and deploy on: push: branches: - main workflow_dispatch: permissions: contents: read pages: write id-token: write concurrency: group: pages cancel-in-progress: false defaults: run: shell: bash jobs: build: runs-on: ubuntu-latest env: DART_SASS_VERSION: 1.98.0 GO_VERSION: 1.26.1 HUGO_VERSION: 0.158.0 NODE_VERSION: 24.14.0 TZ: Europe/Oslo steps: - name: Checkout uses: actions/checkout@v6 with: submodules: recursive fetch-depth: 0 - name: Setup Go uses: actions/setup-go@v6 with: go-version: ${{ env.GO_VERSION }} cache: false - name: Setup Node.js uses: actions/setup-node@v6 with: node-version: ${{ env.NODE_VERSION }} - name: Setup Pages id: pages uses: actions/configure-pages@v5 - name: Create directory for user-specific executable files run: | mkdir -p "${HOME}/.local" - name: Install Dart Sass run: | curl -sLJO "https://github.com/sass/dart-sass/releases/download/${DART_SASS_VERSION}/dart-sass-${DART_SASS_VERSION}-linux-x64.tar.gz" tar -C "${HOME}/.local" -xf "dart-sass-${DART_SASS_VERSION}-linux-x64.tar.gz" rm "dart-sass-${DART_SASS_VERSION}-linux-x64.tar.gz" echo "${HOME}/.local/dart-sass" >> "${GITHUB_PATH}" - name: Install Hugo run: | curl -sLJO "https://github.com/gohugoio/hugo/releases/download/v${HUGO_VERSION}/hugo_extended_${HUGO_VERSION}_linux-amd64.tar.gz" mkdir "${HOME}/.local/hugo" tar -C "${HOME}/.local/hugo" -xf "hugo_extended_${HUGO_VERSION}_linux-amd64.tar.gz" rm "hugo_extended_${HUGO_VERSION}_linux-amd64.tar.gz" echo "${HOME}/.local/hugo" >> "${GITHUB_PATH}" - name: Verify installations run: | echo "Dart Sass: $(sass --version)" echo "Go: $(go version)" echo "Hugo: $(hugo version)" echo "Node.js: $(node --version)" - name: Install Node.js dependencies run: | [[ -f package-lock.json || -f npm-shrinkwrap.json ]] && npm ci || true - name: Configure Git run: | git config core.quotepath false - name: Cache restore id: cache-restore uses: actions/cache/restore@v5 with: path: ${{ runner.temp }}/hugo_cache key: hugo-${{ github.run_id }} restore-keys: hugo- - name: Build the site run: | hugo build \ --gc \ --minify \ --baseURL "${{ steps.pages.outputs.base_url }}/" \ --cacheDir "${{ runner.temp }}/hugo_cache" - name: Cache save id: cache-save uses: actions/cache/save@v5 with: path: ${{ runner.temp }}/hugo_cache key: ${{ steps.cache-restore.outputs.cache-primary-key }} - name: Upload artifact uses: actions/upload-pages-artifact@v3 with: path: ./public deploy: environment: name: github-pages url: ${{ steps.deployment.outputs.page_url }} runs-on: ubuntu-latest needs: build steps: - name: Deploy to GitHub Pages id: deployment uses: actions/deploy-pages@v4 - Step 5
- Commit the changes to your local Git repository and push to your GitHub repository.
- Step 6
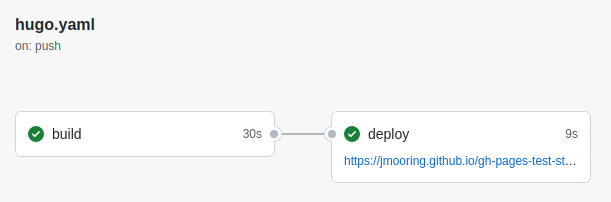
- From GitHub’s main menu, choose Actions. You will see something like this:
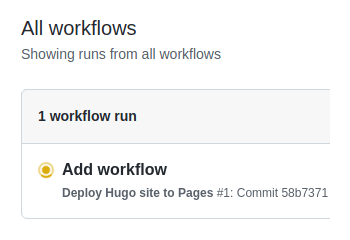
- Step 7
- When GitHub has finished building and deploying your site, the color of the status indicator will change to green.
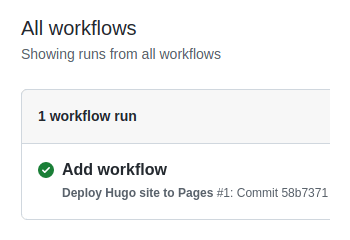
- Step 8
- Click on the commit message as shown above. Under the deploy step, you will see a link to your live site.
In the future, whenever you push a change from your local Git repository, GitHub Pages will rebuild and deploy your site.