
Host on Cloudflare
Host your site on Cloudflare.
Use these instructions to enable continuous deployment from a GitHub repository. The same general steps apply if you are using GitLab for version control.
Prerequisites
Please complete the following tasks before continuing:
- Create a Cloudflare account
- Log in to your Cloudflare account
- Create a GitHub account
- Log in to your GitHub account
- Create a GitHub repository for your project
- Create a local Git repository for your project with a remote reference to your GitHub repository
- Create a Hugo project within your local Git repository and test it with the
hugo servercommand
Procedure
- Step 1
- Create a
wrangler.tomlfile in the root of your project.wrangler.tomlname = "hosting-cloudflare-worker" compatibility_date = "2025-07-31" [build] command = "chmod a+x build.sh && ./build.sh" [assets] directory = "./public" not_found_handling = "404-page" - Step 2
- Create a
build.shfile in the root of your project.build.sh#!/usr/bin/env bash #------------------------------------------------------------------------------ # @file # Builds a Hugo site hosted on a Cloudflare Worker. # # The Cloudflare Worker automatically installs Node.js dependencies. #------------------------------------------------------------------------------ main() { DART_SASS_VERSION=1.98.0 GO_VERSION=1.26.1 HUGO_VERSION=0.157.0 NODE_VERSION=24.14.0 export TZ=Europe/Oslo # Install Dart Sass echo "Installing Dart Sass ${DART_SASS_VERSION}..." curl -sLJO "https://github.com/sass/dart-sass/releases/download/${DART_SASS_VERSION}/dart-sass-${DART_SASS_VERSION}-linux-x64.tar.gz" tar -C "${HOME}/.local" -xf "dart-sass-${DART_SASS_VERSION}-linux-x64.tar.gz" rm "dart-sass-${DART_SASS_VERSION}-linux-x64.tar.gz" export PATH="${HOME}/.local/dart-sass:${PATH}" # Install Go echo "Installing Go ${GO_VERSION}..." curl -sLJO "https://go.dev/dl/go${GO_VERSION}.linux-amd64.tar.gz" tar -C "${HOME}/.local" -xf "go${GO_VERSION}.linux-amd64.tar.gz" rm "go${GO_VERSION}.linux-amd64.tar.gz" export PATH="${HOME}/.local/go/bin:${PATH}" # Install Hugo echo "Installing Hugo ${HUGO_VERSION}..." curl -sLJO "https://github.com/gohugoio/hugo/releases/download/v${HUGO_VERSION}/hugo_extended_${HUGO_VERSION}_linux-amd64.tar.gz" mkdir "${HOME}/.local/hugo" tar -C "${HOME}/.local/hugo" -xf "hugo_extended_${HUGO_VERSION}_linux-amd64.tar.gz" rm "hugo_extended_${HUGO_VERSION}_linux-amd64.tar.gz" export PATH="${HOME}/.local/hugo:${PATH}" # Install Node.js echo "Installing Node.js ${NODE_VERSION}..." curl -sLJO "https://nodejs.org/dist/v${NODE_VERSION}/node-v${NODE_VERSION}-linux-x64.tar.xz" tar -C "${HOME}/.local" -xf "node-v${NODE_VERSION}-linux-x64.tar.xz" rm "node-v${NODE_VERSION}-linux-x64.tar.xz" export PATH="${HOME}/.local/node-v${NODE_VERSION}-linux-x64/bin:${PATH}" # Verify installations echo "Verifying installations..." echo Dart Sass: "$(sass --version)" echo Go: "$(go version)" echo Hugo: "$(hugo version)" echo Node.js: "$(node --version)" # Configure Git echo "Configuring Git..." git config core.quotepath false if [ "$(git rev-parse --is-shallow-repository)" = "true" ]; then git fetch --unshallow fi # Build the site echo "Building the site..." hugo build --gc --minify } set -euo pipefail main "$@" - Step 3
- Commit the changes to your local Git repository and push to your GitHub repository.
- Step 4
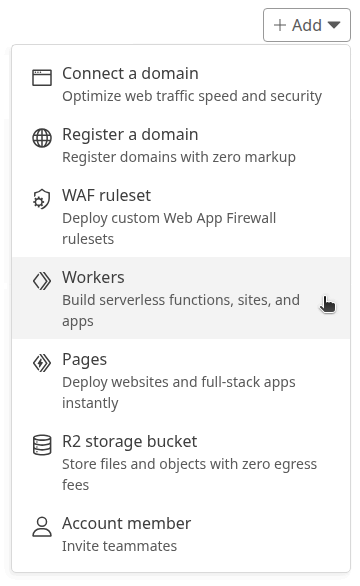
- In the upper right corner of the Cloudflare dashboard, press the Add button and select “Workers” from the drop down menu.
- Step 5
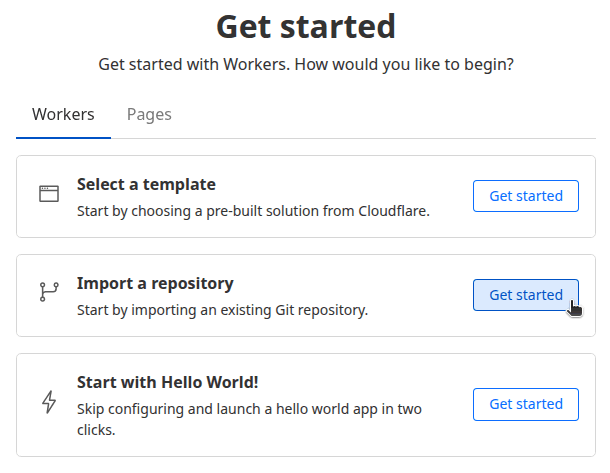
- On the “Workers” tab, press the Get started button to the right of the “Import a repository” item.
- Step 6
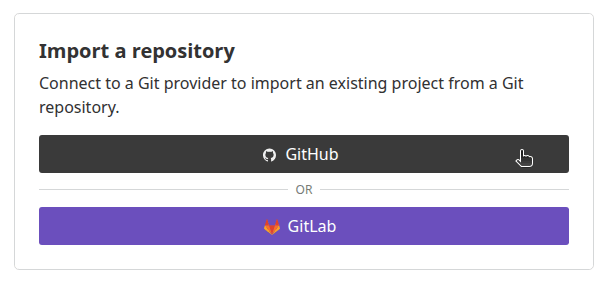
- Connect to GitHub.
- Step 7
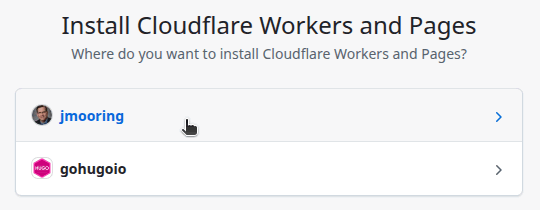
- Select the GitHub account where you want to install the Cloudflare Workers and Pages application.
- Step 8
- Authorize the Cloudflare Workers and Pages application to access all repositories or only select repositories, then press the Install & Authorize button.
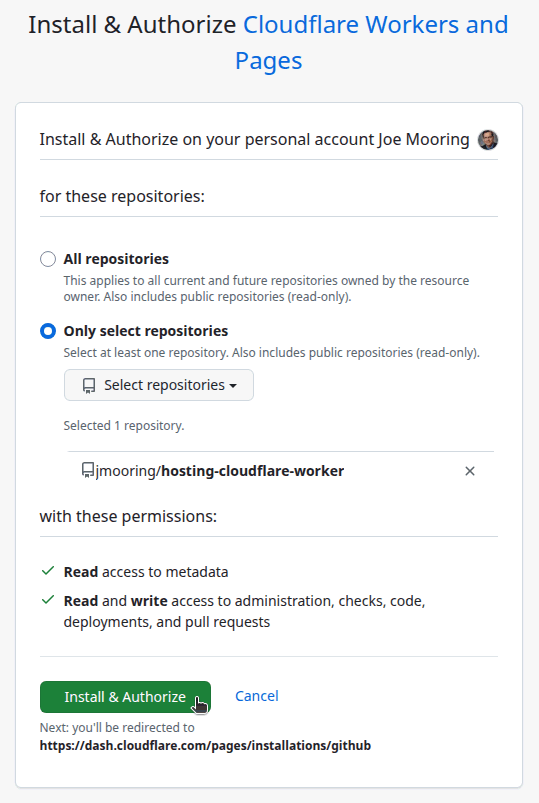
Your browser will be redirected to the Cloudflare dashboard.
- Step 9
- On the “Workers” tab, press the Get started button to the right of the “Import a repository” item.
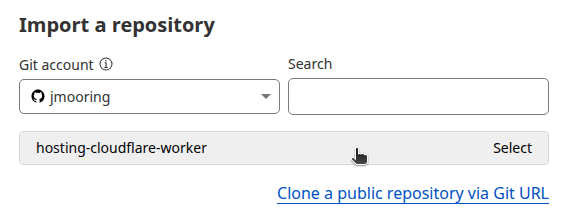
- Step 10
- Select the repository to import.
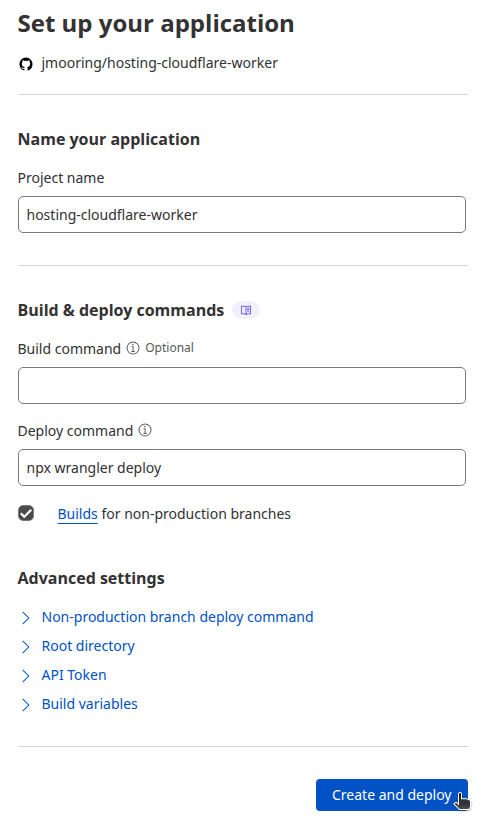
- Step 11
- On the “Set up your application” screen, provide a project name, leave the build command blank, then press the Create and deploy button.
- Step 12
- Wait for the site to build and deploy, then visit your site.

In the future, whenever you push a change from your local Git repository, Cloudflare will rebuild and deploy your site.
Last updated:
March 12, 2026
:
content: Update version references in hosting guides (b17b18ce1)
Improve this page